
Yields:
2
Prep Time:
45 mins
Total Time:
45 mins
Current Time 0:00
Total Duration 1:11

I receive recipes from readers quite frequently, and I read each and every one. I figure if someone’s going to take the time to type out and email me a recipe, it’s probably pretty dadgum good. I have a folder building of the reader recipes I plan to try in the new year, but the one I couldn’t wait to test out was this pie crust recipe, sent to me by Sylvia L., a reader. I’d seen different permutations/combinations of this recipe before—in fact, I believe my mom’s pie crust uses these same ingredients. Something dear Sylvia suggested, though, really caught my eye: “You can even make them ahead of time and freeze them,” she said. “The crusts turn out even flakier!” Now you’re talking, Sylvia.
I really love flaky pie crust for my homemade pies, and it’s always been a difficult quality for me to achieve, despite most people’s claims that their recipe is the flakiest pie crust in existence. I was intrigued, and decided to try Sylvia’s recipe and method here in plain sight. It turns out my friend Sylvia was right. This really is a super flaky, delicious pie crust. Thank you, Sylvia. This recipe is absolutely, positively a keeper.
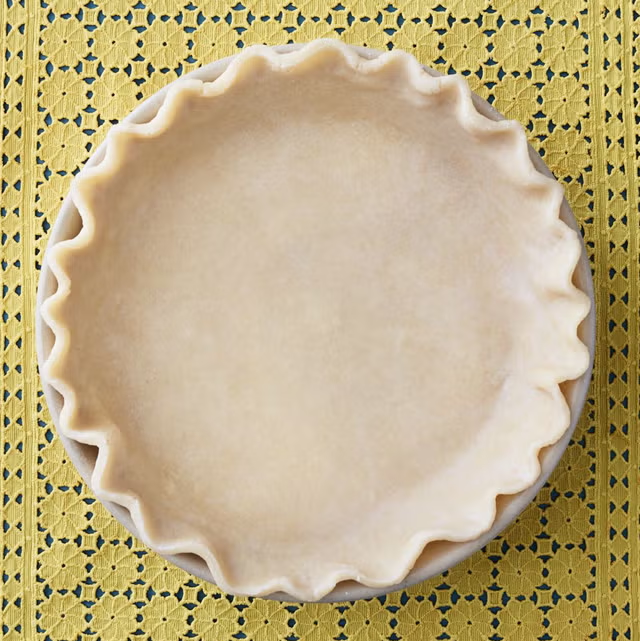
What’s the best way to crimp pie crust?
There are a million ways to crimp pie crust. You can use your fingers to make a pattern or grab a fork and go around the edge pressing the tines into the dough for a different pie crust design. For a classic-looking crimped crust, use your finger and thumb on one hand and a finger from the opposite hand to go around the crust making “v” shapes. Don’t worry about making it perfect. It’ll tastes good no matter how it looks.
Why do you put vinegar in pie crust?
It makes the pie crust exceedingly tender and flaky. Trust me on this!
Why does my pie crust fall apart?
It might be too dry. If you find your crust falling apart, there’s an easy fix. Sprinkle some cold water over the dough, focusing on the dry or cracked patches. Just sprinkle on a little at a time until the dough holds together better.
How do you keep pie crust from sticking to the counter?
Flour is your friend with this recipe. There’s a good bit of shortening in this crust, so you’ll need to generously flour your surface before rolling out the dough to keep it from sticking. If the dough seems too moist on top, sprinkle some flour there too, so it doesn’t stick to your rolling pin. When rolling out the dough, keep an eye on it. Anytime you notice the dough sticking to the counter, use a metal spatula to carefully scrape it loose, then add more flour to the surface before flipping the dough over and continuing rolling.
Advertisement – Continue Reading Below
What tools do you need to make pie crust?
Making pie crust doesn’t require any special tools. As long as you have a few mixing bowls, some measuring spoons and cups, a rolling pin, and a pie plate, you’re all set! That being said, one tool I personally love using to make pie dough is a pastry cutter. Plenty of people swear by using their fingers, a fork, or two knives to cut the shortening into the flour, but I find a pastry cutter makes it even easier. If you don’t have a pastry cutter, just use what you have. You’ll still end up with a great crust!
Ingredients
- 1 1/2 cups vegetable shortening
- 3 cups all-purpose flour, plus more for dusting
- 1 large egg
- 4 Tbsp. ice water
- 1 Tbsp. distilled white vinegar
- 1 tsp. kosher salt
Directions
-
- 1In a large bowl, use a pastry cutter to gradually work the shortening into the flour until it resembles coarse meal, 3 to 4 minutes. In a small bowl, beat the egg with a fork and pour it into the flour mixture. Add the ice water, vinegar, and salt. Stir together gently until all of the ingredients are incorporated and the dough sticks together when pinched.
- 2Divide the dough into 2 equal pieces. Form them into balls, then place each ball in a 1-gallon zip-top plastic bag (do not seal). Using a rolling pin, slightly flatten each ball of dough into a disk (about 1/2 inch thick) to make rolling easier later. Seal the bags and place them in the freezer until you need them. (If you will be using the dough immediately, it’s still a good idea to place it in the freezer for 25 to 30 minutes to chill.)
- 3When you are ready to use the dough to make a crust, remove from the freezer. On a generously floured surface, roll the dough, starting at the center and working your way out. (Sprinkle some flour over the top of the dough if it’s a bit too moist.) Be gentle and patient; it’ll take a little time to get the dough completely rolled out. If the dough is sticking to the countertop, use a metal spatula and carefully scrape it up, flip it over, and continue rolling and adding more flour to the surface and dough as needed until the dough is approximately 2 inches larger than your pie plate.
- 4Using a spatula, carefully lift the dough from the surface of the counter into the pie plate (or you can roll the pastry over the rolling pin, lift it onto the pie plate, and unroll it). Lift the edges of the dough gently and allow the dough to settle naturally into the plate, fitting snugly along the bottom and sides without pressing or stretching (to avoid shrinking during baking). Trim any excess dough, leaving an overhang of about 1 inch. Go around the pie plate, pinching and tucking the dough under itself to create a clean edge.
- 5If you are making a single-crust pie, crimp or flute the edges as desired, using a fork or your fingers. The crust is now ready to be par-baked or filled, as your recipe specifies. If you are making a double-crust pie, roll out the remaining dough and use it to top your filling.

The cast of characters: Crisco (vegetable shortening), flour, salt, water, vinegar, and egg. Oh, how could anything so right ever go wrong?

First, measure 3 cups all-purpose flour into a mixing bowl.

Next, measure 1 1/2 cups Crisco. For once in my life, I’m going to say this…and then it will never happen again: You must use Crisco, not butter. Butter simply will not work.
Lord, please forgive me.
And what is UP with my finger in this photo? How scary does THAT look?

Add the Crisco to the flour…

And find your pastry cutter. It really is an essential tool when it comes to pie crust. (Yeah, yeah, you can use “two knives” and all that, but I’ve never done that successfully. Actually, I’ve never tried it. But if I ever tried it, I know it wouldn’t work. I just know it.)

Using the pastry cutter…

Just gradually work the Crisco into the flour.

You should expect this to take 3 to 4 minutes…

Just keep working until the mixture resembles “coarse meal,” though I’ve never really understood what that means. Basically, there should be no large chunks of shortening left; it should all be integrated into the flour. Or the flour should be integrated into the shortening. It’s all how you look at it.

Now crack an egg into a bowl…


And beat it with a fork.

Now pour the egg into the flour/shortening mixture.

Add 5 tablespoons cold water…

Then find your white vinegar…

And add 1 tablespoon.


Next, add 1 teaspoon of salt…

And stir together gently.

That means don’t beat the tar out of it. Just incorporate the ingredients, man.

Now stick your big claw into the bowl and remove one-third of the dough.

Repeat to form three evenly-sized balls of dough.

Now place each dough into a large Ziploc bag.

We’re going to prepare the balls of dough for freezing.

Using a rolling pin, slightly flatten each ball of dough to make rolling easier later…

Then seal each Ziploc and place bags in the FREEZER—yes, Sylvia, I’m listenin’ to ya, honey—until you need them.
I was pleased, though, that it only took about fifteen minutes of thawing on the countertop before the dough was ready to roll. It’s best to begin while the dough is quite firm, so no need to wait around forever.

Begin by flouring the surface.

Spread out the flour so it’s evenly distributed, and if you ever have the opportunity to re-do any surface in your kitchen, I’d highly recommend plain ol’ stainless steel sheet metal. It’s cheap and smooth and seamless and cool.
And when I say “sheet metal,” I mean sheet metal. I didn’t have no fancy-schmancy high-fallutin kitchen designer have my stainless steel countertop specially fabricated. I called a sheet metal place, gave them my measurements, and said, “Can I have some stainless steel, please?” It was very gratifying.

Now, remove the disc of dough from the Ziploc and place it on the floured surface. Sprinkle a little flour on top. The dough started out a little moist, so don’t be afraid to use a little flour to keep it from sticking.

Now, with a rolling pin, begin rolling the dough from the center, outward.

Be on the gentle side. It’ll take some time to get it completely rolled out.

Just remember: roll from the center, outward in one stroke. Don’t do the ol’ Play-Dough back-and-forth, back-and-forth maneuver. Pie crust dough doesn’t like it.

When the dough begins to crack around the edges, just use your hands to form it back into the shape of a circle.

If you feel as though the bottom is really sticking to the surface below, just use a nice, sharp spatula and flip it over.

Just be sure to flour the surface again before you flip it.

Continue the rolling process until the rolled dough is about 1/2 inch larger (all the way around) than the diameter of the pie pan.

Then, with the spatula, if necessary, lift the dough from the surface and gently set it onto the pie pan.
And I like metal, traditional pie pans. Glass pie dishes are against my religion, but if that’s what you prefer, go forth in peace.

Gently adjust the dough so that it’s laying right against the pan.

Now, I hate trimming the pie crust from around the pan, so I usually just tuck the excess dough under the rim…

No need to be perfect; just go around the pie pan and tuck it under.